
In today’s current state of the music industry, and most industries, marketing has become a highly-valued tool that has had it’s depth gatekept by larger players. People want you to sign up to their mailing list to get a PDF download that says a bunch of nothing or has excerpts pulled from the platform’s resources pages as they lure you into a sales funnel. This blog isn’t that. It’s some insight from someone that has worked professionally in marketing for a few years and has used ad platforms like Meta (Facebook/Instagram), Google, TikTok, and some others to advertise in the music industry for the last few years – for a music venue, to be specific. I’m in no way claiming to be an expert, but I’m able to navigate these platforms and narrow down the sometimes dizzying amount of options to build ads based on the objective I’m after, and I’ve spent a good amount of time on calls with reps that have given me more insight on the finer details of these platforms.
I’m sharing this information in the hopes that it will catch the eye of independent artists trying to figure out how to not burn money by attempting to advertise on these complex platforms that love to eat whatever budget you feed them. The main purpose of the MOTF blog is to share any insight I have that can help others navigate some of the complexities of trying to sustain a passion. So if you want to learn about Meta Ads/Facebook Ads/Instagram Ads, I’m here to assist.
Fair warning: getting to the point of comfortably creating ad campaigns like this took months, so this post is summarizing a lot, which means it can be a lot to digest. Maybe too much for one sitting, or maybe you’ve handled some of this already. That’s why I’ve created a useful little set of links to take you to the different sections. So now I’ll get to it.
Table of contents – click on any of these links to scroll to the specific sections of the post.
First, I’ll address Meta since it’s probably the best-suited for budgets that aren’t in the $1,000’s and it’s a prominent ad platform. If you’re just trying to dabble, you’ve probably set up ads directly in Instagram or Meta Business Suite. Even though those make it accessible, it doesn’t give you the most flexibility in setting up ad campaigns. If you want more intricate control of your ads, Ads Manager is the way to go. This does take some additional steps to set it up, but it really makes a difference in building your ads and tailoring them to your target audience(s).
You can use Ads Manager without having a Business account, but I’d say it’s better business hygiene to use a business account. If you have any sort of official business structure in place (LLC, Sole Proprietor with a registered DBA, etc.) it’d probably be better to go this route. You can start by going to business.facebook.com and starting a “business portfolio” (used to be a business profile, but they’re always changing things). From there it’ll ask you to enter your business info and get a payment method in place. All these steps are fairly laid out so I won’t go any further into it for now, but just note that how I break down ad campaign creation is based on Ads Manager, not either of the other options.
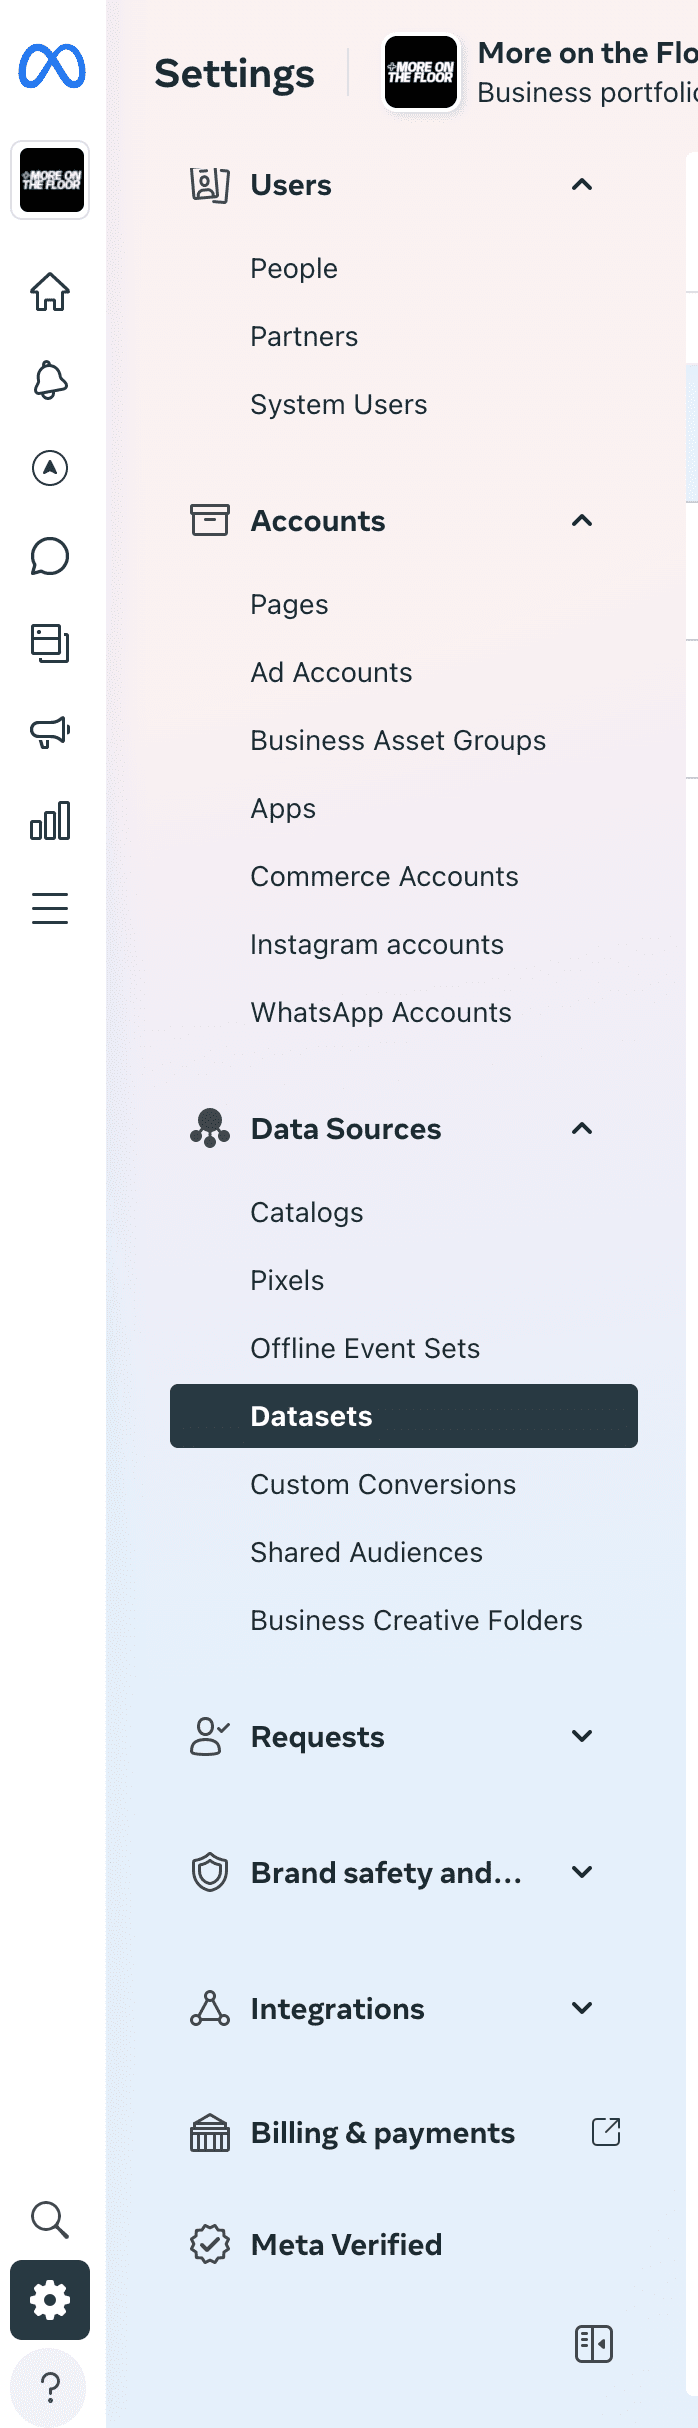
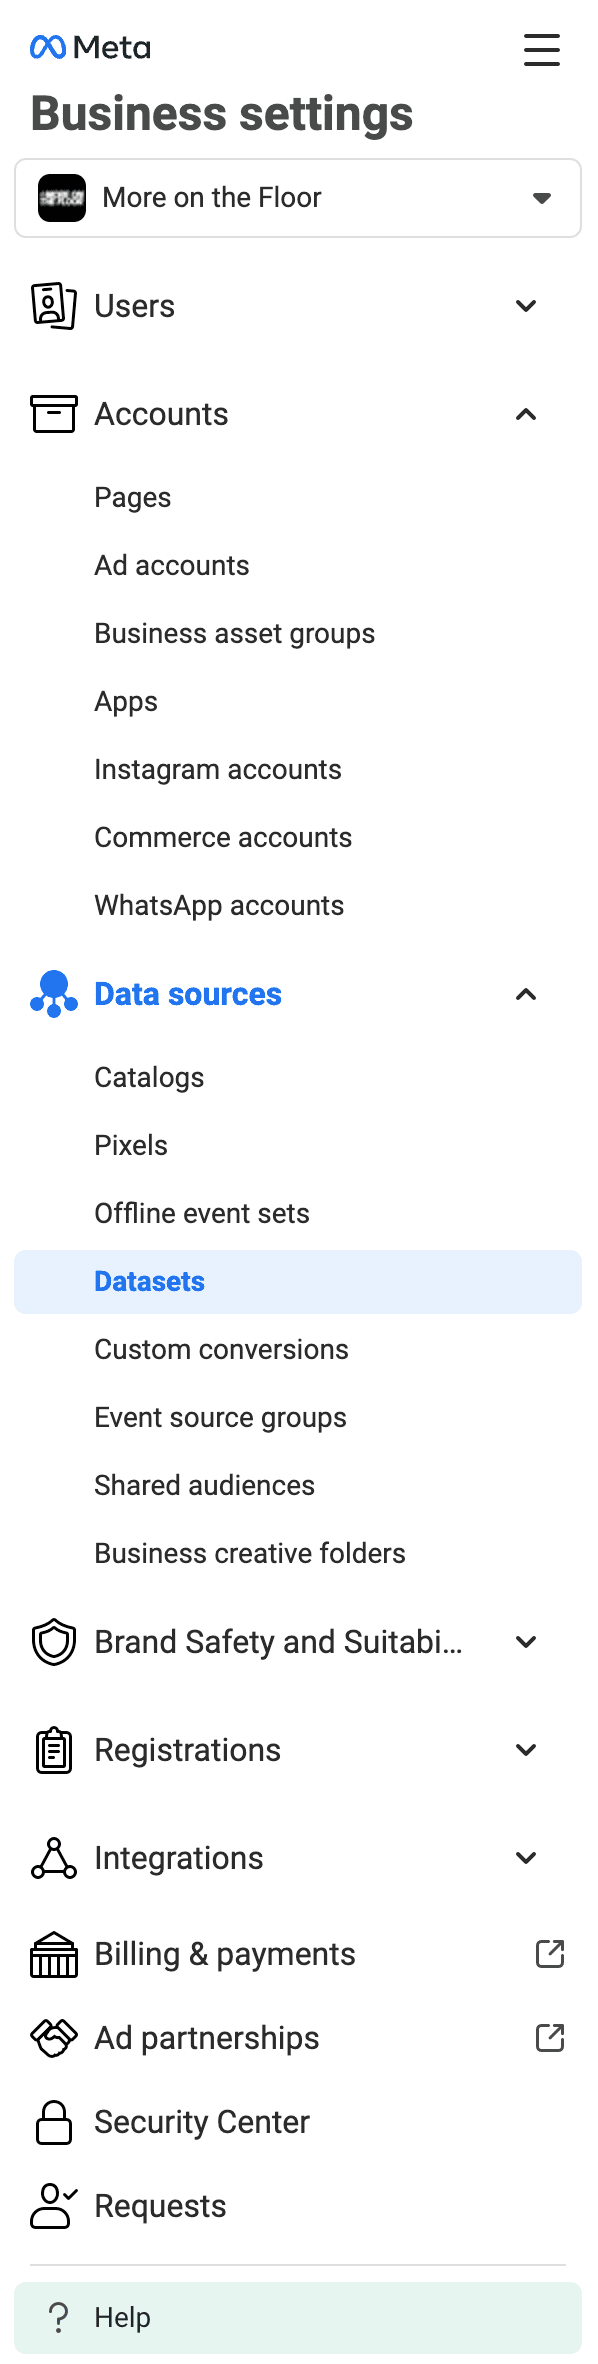
For brevity, I’ll reference Meta Business Suite as MBS, and the Ads Manager side will be referenced as Ads. Before creating ads, I want to note that if you have a website, or Linktree, or anything where you’d want to use that traffic to target your audience (you’re going to want to use this data), it’s crucial to set up a Pixel, as your ads will contribute to the data the Pixel collects, as well as any external websites connected to it. If you’re using MBS, you’ll click on the Settings gear icon in the bottom left of the window, then expand the Data Sources dropdown, and go to “Datasets” (like I said, Facebook always changes things, so there is still a “Pixels” option that now redirects you to Datasets). If you’re using Ads, it’s a very similar placement for this link, seen below on the right photo.
Before we go any further, I just want to put out a disclaimer that this is all for informational purposes, if you choose to follow this guide, you do so at your own risk.
Pixel setup requires a bit of website navigation of varying degrees depending on the platform you’re adding (WordPress, Shopify, etc.) so it helps to have a bit of know-how for basic web development. And here is the part where I am slightly offering something for sale (my services) – if you don’t know this or are afraid to make some of these changes, I can help you out, drop me an email at alex@moreonthefloor.com. If this all sounds like too much for you already and you don’t want to read further, also drop me an email. This is part of what I’ll be offering for creative and marketing services under MOTIF [by More on the Floor] and I’m happy to talk about getting your data flow set up. If you’re brave, keep reading, you can do this.
Once you’re in Datasets, you’ll see the “Add+” button in the upper right of the screen in MBS, and in Ads it’ll have it’s own column in the main page area. Another new change is that it prompts you to opt-in for a Conversions API Gateway, it’s not necessary, especially if you’re not trying to be swept up in the network of rabbit holes ads can take you down. Go with the recommended Meta Pixel and Conversions API option. If you need to come back to this later and close the initial pop-up windows, it’s okay, you can add integrations in Events Manager at any time.
Now this takes you to a crossroad, manual implementation or partner integration. This is where you have to take a second to yourself and maybe write down a bit of a plan. What web traffic do you want to track? If you have a website or e-commerce store, it can be added there. Some platforms like Linktree, Mailchimp (or other email platforms), and Hypeddit have pixel integration for paid tiers, so if you are paying for subscriptions, you might as well use that data and add the source to your pixel. There are dozens of integrations, so it’d be good to do a bit of digging to find out if the platforms you use offer this. Most of those are as simple to set up as adding your Pixel in their settings, and being sure you whitelist their domain (e.g. mailchimp.com) in your Pixel (details on this later).
One important thing of note is that whatever you decide to set up for pixel integration, be sure you are following the appropriate guidelines around data privacy and protection. That’s a whole other monster to get into, but the gist is that if you are tracking data, you usually have to disclaim it (those cookie pop-ups on most websites that ask you to accept all cookies or deny certain ones are an example of this). Data privacy laws vary by country, so it helps to have at least a privacy page on your site that can usually be generated when creating the site (several platforms help generate these by default).
Okay, you start setting up integrations. I’ll use WordPress as the main example. Ads and MBS will take you through some prompts that also give instructions on setup. For WordPress, there is a plugin to install to set up the pixel on your site without having to dive into the code. (Install at your own risk, and always be sure plugins you install are from trusted developers)
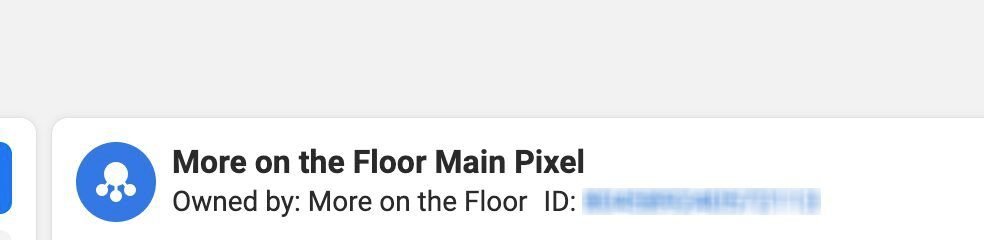
If you have any sort of note for links or somewhere you keep this stuff in an organized place, it’d be good to copy and paste your pixel ID so that you don’t have to keep finding your way back to copy it for later use. Facebook has a couple areas where it’s listed and clicking on it will copy it to your clipboard. The example below shows you, with my own Pixel ID in there but obviously blurred out.
Okay, you’ve got the ad account setup out of the way, now time to actually make some ads. When in Ads, you’ll see this each time you create a new campaign.
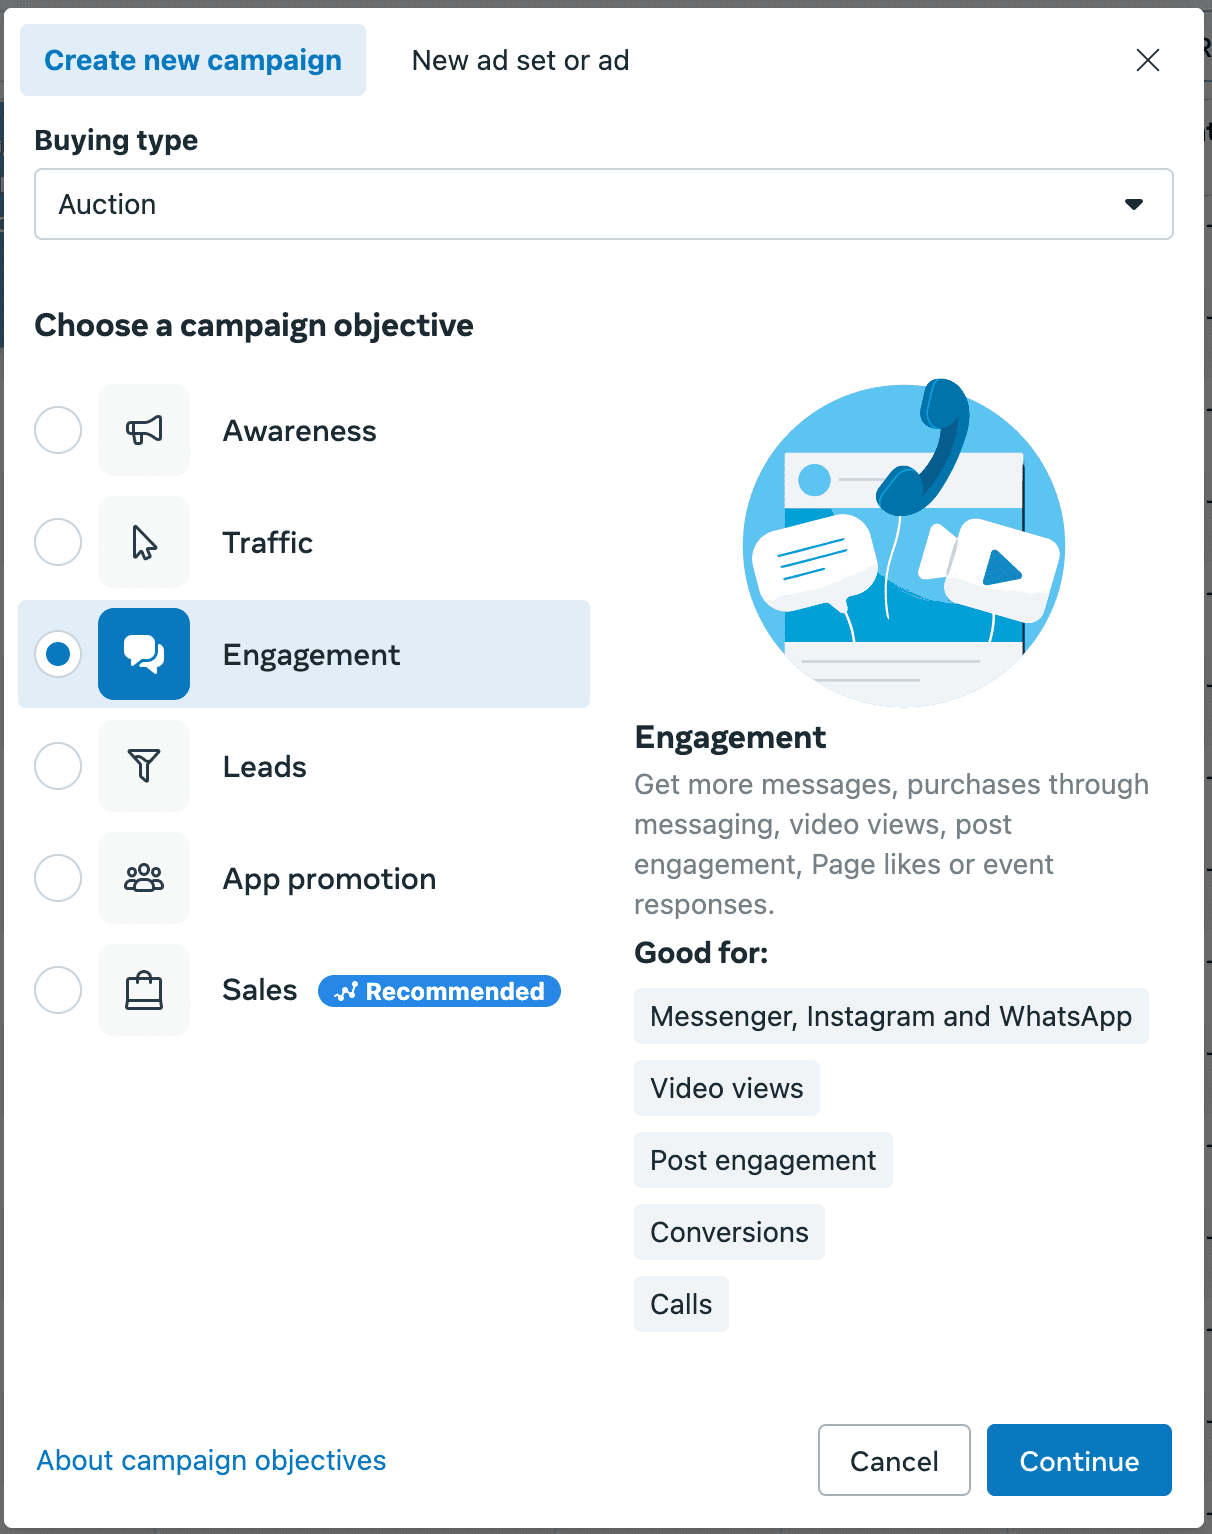
The objectives that are most relevant are the first 3. Traffic ads are the most cost-friendly, so I’ll start with that objective for the example. I’ll make another post that goes deeper into the differences in the objectives, and also the finer details within each one. As you hover over each objective, it gives you a brief summary of the uses of each one in the “Good for:” section.
Fair warning, if you are new to running ads or don’t have much web traffic data to pull from, your cost per result will be higher than average because the platform is spending more money to find better matches from a limited audience. More on these mechanics later (told you this is a lot).
You choose your objective, hit Continue, and now the next window. Meta loves to overcomplicate their platform, and thanks to AI being everywhere, they implement theirs any way they can, but a lot of it is fluff that most likely won’t help, or throws off your creative, so it’s better to go with the manual setup.
Now a walkthrough for the manual setup.
It helps to create a taxonomy of sorts to keep track of your campaigns if you’re going to be running them often. Simply using the date, objective, and a brief description will help you differentiate as the list grows, and is also easier to view at a glance when you’re going over metrics.
Special Categories can be ignored, if you’re an artist then none of them should apply to you but you can browse the list if you want to see what they consist of. Leave Buying Type as Auction, and the objective as-is. Turn on the Advantage Campaign Budget, and then another fork. If you want to run more of an evergreen ad, a daily budget would be good for that. If you want to work within a fixed budget, do the lifetime budget. Again, more mechanics go into these options, but right now they aren’t the most crucial.
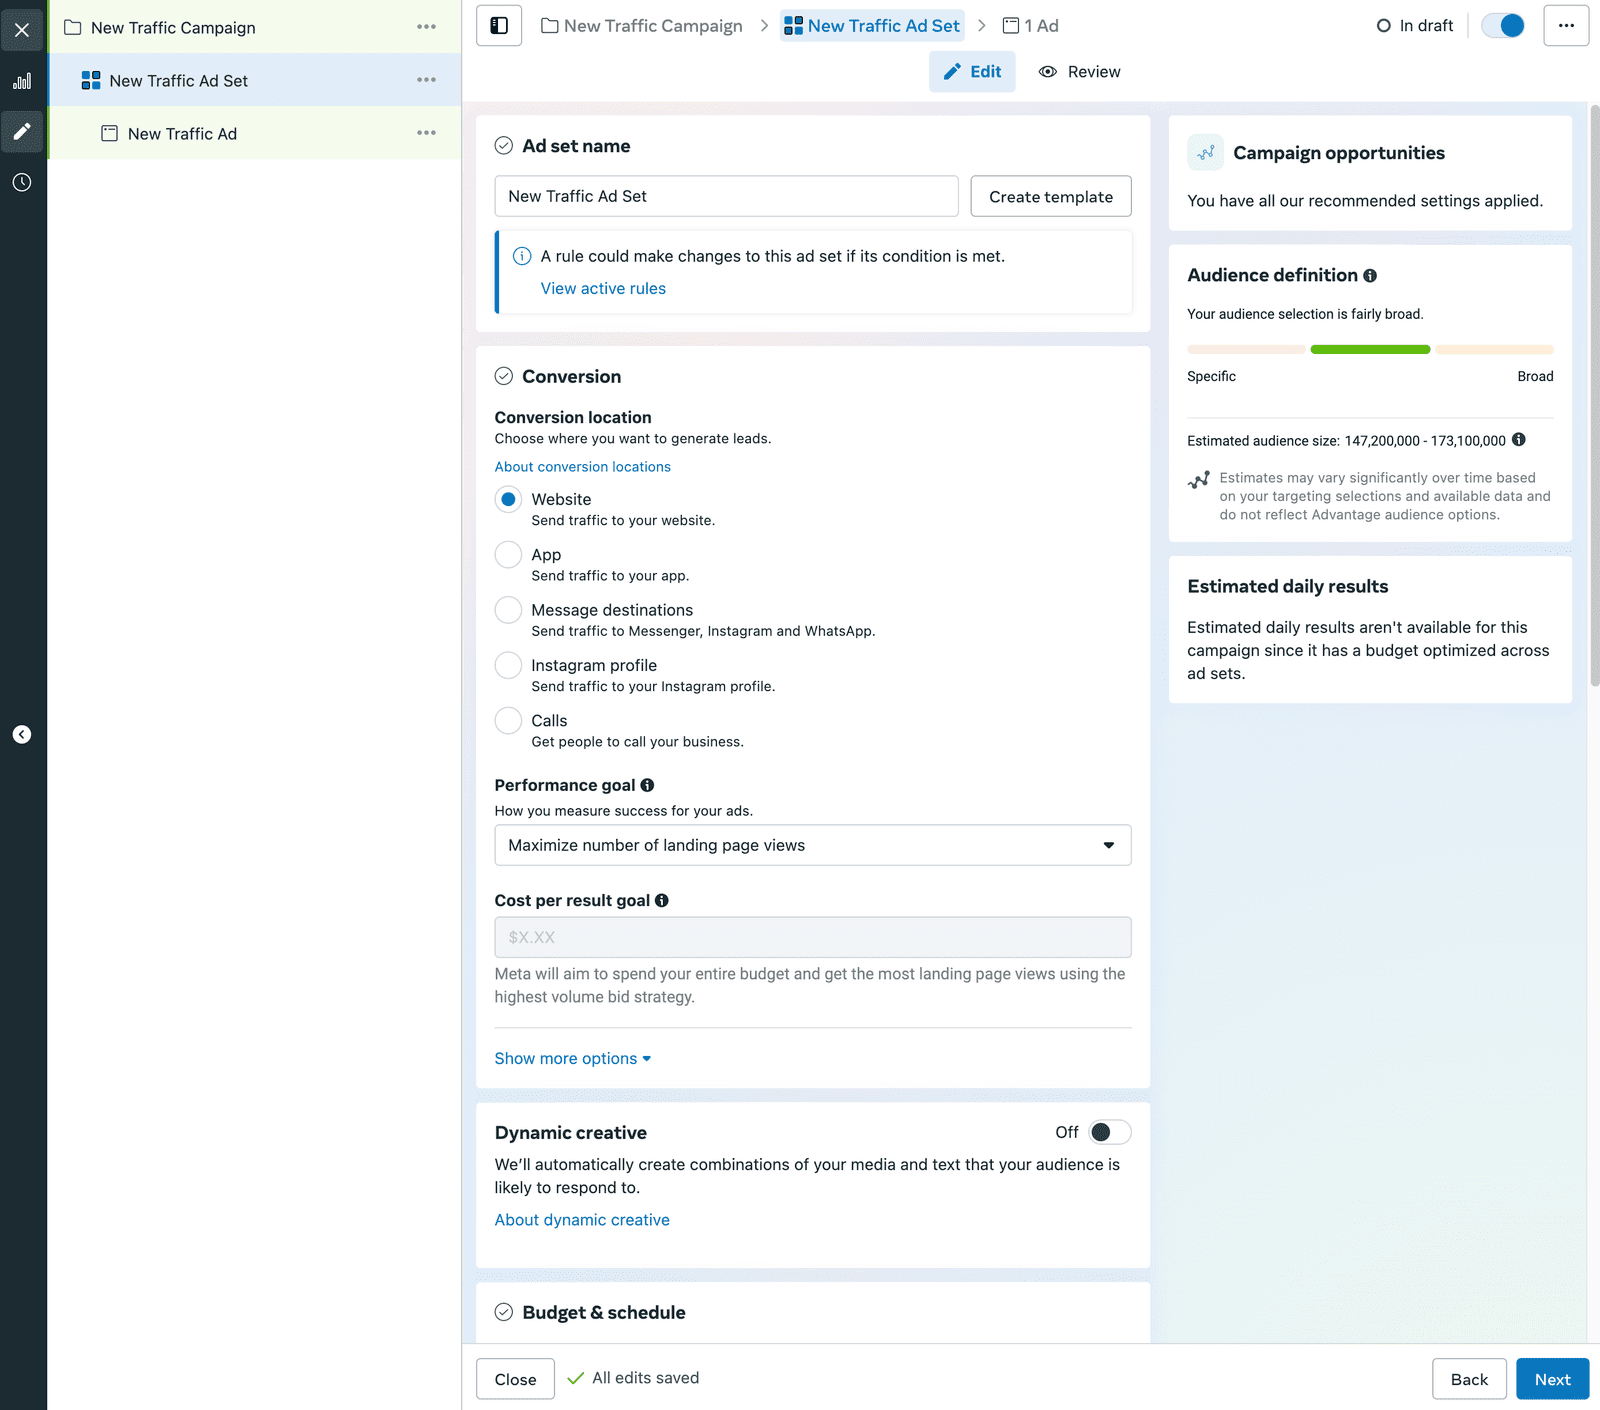
Now, you hit next and are at the ad set level. This is where most of the mechanics of your ad campaign will be set up. You’ll want to cater the conversion to your “ad creative” aka whatever photo, video, and text you’re using in the ad. However, it is sort of a rule of thumb that using video for ad creative has the best performance results, since all platforms are currently competing in the short-form video space (something I personally hate). For a Traffic campaign, the usual conversions are Link Clicks and Page Views under the Website conversion location. Those are the strengths that a Traffic campaign plays to.
Side note– you can change objectives while creating an ad, but it will remove most of your setup in the campaign, so it’s better to start new campaigns instead. You can even fully build out a campaign for each type of objective, then duplicate them so you always have a sort of template to begin with.
There are some nuances to these conversions under Performance Goal, I’ll give an example for Traffic. Link clicks is a “lower value” conversion because someone can click your link and immediately exit your site. The ad performance reports will show these as conversions, but what value is there to someone doing this? None, really. The only good thing it does is bring these people into your Pixel data. Page views are a good conversion, but have a higher cost per conversion rate, because it is a higher value conversion. Page view is when someone not only clicks your link, but loads your site and scrolls it. This is someone with higher intent to interact with your site, which means a higher value conversion, but costs more to find these vs. people that will simply click a link. So the more money an ad spends finding these people, the higher the cost per result. Ad platforms are truly wonderful.
Another Meta AI feature. If you don’t have a robust library of creative, it’s best to leave this off. It requires more text options, images, and videos, which can be taxing of your time to create and still might not help all that much with results. But if you’re on top of it all and have plenty of creative to work with, give it a shot and see if it gets results you like.
The schedule part is pretty self-explanatory. If you’re using a campaign with a lifetime budget, you do have to specify an end date. If you’re using a daily budget, and end date is not required, but be careful because if you’re not keeping an eye on ads, they will keep running and keep spending. Another reason it’s a bit easier to go with a lifetime budget.
For ad set spending limit, I won’t go into this for now, but will touch on it a bit when getting into some other options for ad setup.
This is an important part of the ads, so I’ll go into a bit more detail on this one. In the location, by default it gives you your country. For the most part, you don’t want to target an entire country, because realistically, some person on a farm in the middle of a rural area probably isn’t going to pre-save your track on Spotify.
You can add locations by entering cities, and then adjust the radius to grab some of the surrounding area, but a more streamlined option is to click the “Add locations in bulk” and choose DMAs. As I’m based in the US, I have to mention this map for DMAs is for the US states only. I’m not familiar with any comparable map for other areas of the globe (if you are savvy to this info, feel free to let me know and I’ll update with that). Some big marketing research companies went through the trouble of laying out these areas on a map, sort of like gerrymandering. These areas are basically economic regions that will have an influence on advertising costs. As you add cities, you’ll see the areas they represent on the map and how much they can vary in size and region. Some of the DMAs will cover half a state (US state), some will cover just a major metropolitan area. Here is a link to a map with the DMA breakdown.

If you’re promoting an event, you’ll most likely only want the immediately surrounding areas, so maybe a single DMA would work for you. If you’re in more densely populated area, you may want to target the nearby DMAs. If you reference the map linked above, you can see the region names (pay attention to the spelling), and then edit if it seems too broad. If that’s the case, you can mix and match DMAs and cities/counties/etc. in the locations. Be sure you select the proper location, as there are usually multiple options when typing in a name. Since I’m in San Francisco, I used my area as an example in the image above. The selected areas are pretty broad, so you’d probably not want to go that wide, because then you’re spending money sending ads to people outside of your region that may not travel to your event. BUT if you are pretty knowledgeable about an area’s fan base and know it’s a good area to send ads to, go get it.
If you look at the image above you see the “Show more options” at the very bottom. If you are promoting for a 21+ club, you’ll want to open that and change the minimum age, so that you’re not serving ads to underage people. Facebook doesn’t allow ads to be delivered to minors, but it’s also a waste of your money if you’re promoting for a club night that people under 21 can’t go to.
Probably the most in-depth and crucial part of ad setup right here. Custom audiences are going to be how you tap into the power of your Pixel data, and also your “content” (I hate what the word has come to mean but it applies here). Create New > Custom Audience opens up a lot of options for your targeting. Your pixel data will be under the Website option, so I’ll go over that to start. Once you select website, you’ll see several areas as pictured below. Leave the “Any” option at the top as is.
By default it selects all website visitors, which is all website traffic linked to your pixel, but you can get more granular with your audience if you want. I’d only suggest going deeper if you have gone through the steps to set up events in your pixel, also added multiple web sources to it, or have different pages on your website you want to focus on. Otherwise, it simplifies this step by sticking to all traffic on your pixel, which isn’t a bad thing. If you have some very specific targeting in mind for your campaign, this is the step to handle that.
Say you want to target people that are clicking on your music links. Under Events you’d pick the option “People who visited specific pages” and then you can begin adding URL info. You don’t have to add the full URL, but you want to make sure you accurately add the URL info you want to pull from, typos will ruin this for you. URL > contains helps achieve this, instead of it having to be an exact match.
Here you can add something like a release title or track title. What this tells Facebook is that any of your audience that has visited a link with that value should be sent this ad. That’s targeting in a nutshell. You can expand on these URL targeting choices by clicking the “Include More People” button below, and repeating the process for other relevant URLs. Each custom audience lets you add up to 5 sources, but it’s not necessary to use all 5.
If you are a business or someone with access to multiple websites, this is where you can get more specific with your targeting in a helpful way. If you’re marketing a house track, you probably don’t want to target the dubstep crowd. Sure there are some people that like it all, but most of your audience will probably follow into either/or, but not both.
Okay, you’ve populated the URL info you want, now to save it. The Audience Name is actually really helpful, so try to be strategic and specific about the name. You want to do this that way you can reuse the audience for other campaigns if it shows good results. And audience isn’t specific to a campaign once you create it, it’s an account level data source, which you can also share to other ad accounts. I’ll touch on this in the Key Notes.
So that’s audiences using Website data. When you click on create custom audience, you’ll notice lots of other options. I’d say the most relevant for artists are the Video, Instagram, and Facebook options aside from the Website option I just explained. Each of those options also allow you some control in refining them, I’ll break down these different choices in more depth in another blog post, as this one is already taking me long enough to finish lol.
Now that you’ve created your audience, you get a prompt to create a lookalike audience. This is useful and usually necessary for the performance of your ads. Unless you have really high social counts (like 40k plus followers), your audience data will probably be limited and you’re likely to get warnings that your audience is too small. This greatly increases the cost per conversion, so it’s important to at least begin with a broad audience and refine it based on metrics.
Lookalike audiences are based on country, so if you’re targeting international audiences, you’ll want to be sure to create a lookalike for each country. This is another place you have to be careful, because places like the European Union have different standards for marketing than the US, so you have to be sure your ads are in compliance with those as well. If you’re marketing your own music, this shouldn’t present any issues, but it’s good to keep these points in mind as privacy and security are regularly changing to restrict more marketing efforts that use customer data.
So you pick the country, then you see a sliding scaled of percents from 1%-10%. Think of those as the diameter of a circle. The larger the circle, the more people it will look at. Lookalikes are based on users with similar likes/interests, behavior, and accounts followed. It starts with the people most similar to your audience, and expands from there the higher you go in percentage. You’ll see estimated audience sizes when creating custom audiences, so if you see an audience with pretty low numbers, it’d be helpful to use a larger percentage for it’s lookalike audience. But you have to be sure not to get too carried away, because if you go too broad without strong audience data, your ads will start to deliver to people that most likely won’t pay attention to them because they’re not who you’re actually trying to target.
Aside from the percents, it gives you a dropdown of numbers. What that does is divide the lookalike audiences. If you’re taking a longer approach to marketing, you may want to go this route to test out different ad sets, as it’ll help you eliminate some audience data based on the metrics you see. So if you have 2% for your lookalike, and choose 2, it’ll split your audience into the first 1%, then another audience for 1-2%. For this example and basic ad creation, you don’t need to go this far, you can bump the slider up a couple of percentages and that audience should be fine for your needs. 3-5% usually is a decent working range for this.
Age and gender is pretty self-explanatory so I won’t explain those, aside from being sure to set them to your known demographics. If you’re making electronic music, I don’t think you’d want to target people in Kansas that are 65+. Going into your insights in your social accounts gives you a breakdown of the age ranges that interact with your profile the most, that’s a good basis for setting this up.
Sometimes referred to as affinity interests, this is a useful section to broaden your audience more based on relevant interests. It’s important to note that this is populated by Facebook pages and interests, it doesn’t pull from Instagram data. Some Instagram pages that have a large following have almost no presence on Facebook, and will not populate because Facebook seems to pull more established profiles and interests for this.
They have some pretty broad interests like electronic music, and electronic dance music, and when browsing you’ll see their estimated audience sizes. There are also some genres in there like house music, techno, drum and bass, along with some of the more prevalent artists like Four Tet, Jamie Jones, Carl Cox, etc. but you can occasionally find some other artists that you thought might not be in there.
Using detailed targeting helps broaden your audience, which helps with targeting. It’s like casting a wider net to catch more fish. Sometimes that net catches other creatures, and that’s what targeting will do as well, but as your ad sets run, they are learning, so they refine on their own. This is why it helps to start with a broader audience.
After talking to some Meta Marketing reps (they only make these people available for higher profile accounts), they suggested each ad set use Detailed targeting. I’ve found this advice to hold true and help performance, so you can trust that. An older approach is to have an ad set just for detailed targeting, separated from your custom audiences, but that’s been proven less effective.
Side note: if you see an ad performing well, you can go into your ad set and after Detailed targeting you see the “Save Audience” button. It will save your custom audiences, locations, and detailed targeting for future use, which is a time saver if you’re creating multiple similar ads. If you want to apply these to other ad sets, the “Use Saved Audience” is just above Locations in the Audience Controls area of the ad set.
We’re almost to the end of ad sets. The final setup option is this. You can be selective about your ad placements, but with how Meta’s ads are set up and with what features they’re trying to push and develop, it’s better to leave the automatic placement option on and just be sure you have the correct dimensions for the 3 main placement sizes, which are 1080×1080 (or larger square sizes), 1080×1920 (story/Reel size), and 1920×1005 (1.91:1 aspect ratio). You can upload artwork in larger sizes in these aspect ratios, but if you want your ads to perform well, never upload artwork with poor resolution.
Okay, we’re at the 3rd and final part of ad creation, this one is less complicated. As mentioned, your ad name taxonomy will help you stay organized and make your review easier, so use concise naming for your Campaign, Ad Set, and Ad. You’ll see your Facebook and Instagram pages in the dropdowns in Identity. And if you manage multiple pages and have the appropriate access, you’ll have other accounts in those dropdowns. This is where the term “dark ads” comes into play. From your account, you can run ads on the accounts you have access to, and it will show as coming from their profiles. If you are a manager and run ads for artists, they’ll be in here or should be in here.
Partnership ad is usually turned on automatically if you are boosting a post that is a collaborative post with another page. So something like promoting an event where it is artist, label, and venue all on one post. This helps with the reach but also creates some complication in ads, because you will need Partnership access to the other pages in order to boost a collab post. Here’s a quick way to get it set up:
Instagram > Settings > Creator Tools and Controls > Partnership Ads > Manage ad permissions.
If you are running the ads for a collab post, you will need partnership access from all profiles included if they are anything aside from a personal profile (so creator accounts and business accounts, which can be changed on Instagram). You can copy/paste the directory above and send it to them, then they just have to follow it and accept the partnership request in Manage ad permissions.
Unless you have an online store linked and you’re advertising products, you’ll want to use Manual Upload instead of Advantage+ Catalog. The latter option makes creative setup much more tedious so you don’t want to bother with that unless you have a product catalog.
This will depend on the creative you have ready for your ads. It can be images or video, and you’ll still be prompted to upload your creative in the 3 size formats I mentioned earlier. Having all of the correct sizes also helps with your ad delivery, so if you don’t have your art prepped, take a pause on ads and get those together.
If your creative is something like an event flyer, you’ll want to use Single Image or Video or Carousel. Single will display the 3 sizes of your art across all ad placements, and is usually the option that will get your ads the most reach, and presented as you intend. Facebook likes to implement new features that will switch around your text and images, sometimes producing less-than desirable results. Collection doesn’t apply for most cases for artists so I’ll skip that.
Multi-advertiser ads is fine to leave checked, it expands on your ad delivery, which helps keep the cost down based on how Meta has optimized it’s platform.
Here you will upload your art/creative/content in the 3 dimensions (1080×1080, 1080×1920, 1920×1005) whether you are using an image (aka static art) or video. Facebook recently made this part much more complicated, so I’ll breeze through this as quickly as possible. You can exclude the source URL, it does that to generate site links, which aren’t always necessary and sometimes can clutter your ad.
Primary text is your ad copy, it will be your caption on Instagram or your post text on Facebook. You can create several versions of ad copy if you want, it will alternate them to see which performs best. But that’s not necessary, it’s just another option for optimization.
Headline is just that, it’ll be the title shown under your ad on Facebook, but doesn’t display on Instagram.
Description is another text area that is displayed only for some ad placements, so it’s not necessary.
Call to action (or CTA for short) – the “Listen Now” or “Learn More” button or banner. On Facebook, it’s show as the button right of the title, on Instagram it’s the colored bar just below the image/video and above the like and comment count. This you can choose based on what’s appropriate for your ad.
Media is self-explanatory, upload your creative from your computer unless you are reusing creative you’ve run on ads before.
Crop – If your content isn’t in the correct dimensions I mentioned, it will prompt you to crop your art. If your video is longer than that 15 seconds, it will prompt you to crop your video, but you do not have to, you can leave it the original length and hit next.
AI Generation – IF ONLY YOU KNEW HOW MUCH I LOVE ALL THIS USELESS AI IMPLEMENTATION. If you’re absolutely lazy, you can can have Meta’s AI generate images and text options for you. Or if you want a good laugh, check the images it produces then skip and continue.
Enhancements – Be thorough here because Facebook has some applied by default. It will only show a couple, but the rest are revealed by clicking on the dropdown. These are more superfluous features that aren’t exactly helpful for all creative.
You can quickly turn them all off by clicking the All optimizations radio button on and then off. If you expand the “Other active enhancements” dropdown link you’ll see all the options. You may want to leave some on, like relevant comments, Enhance CTA, and Text improvements. Again, this will depend on the creative you’re using, as some of these options may alter it in a way that you don’t like or don’t deem an effective use of your creative. You can always test them and review after running your ads to see if any work well for you.
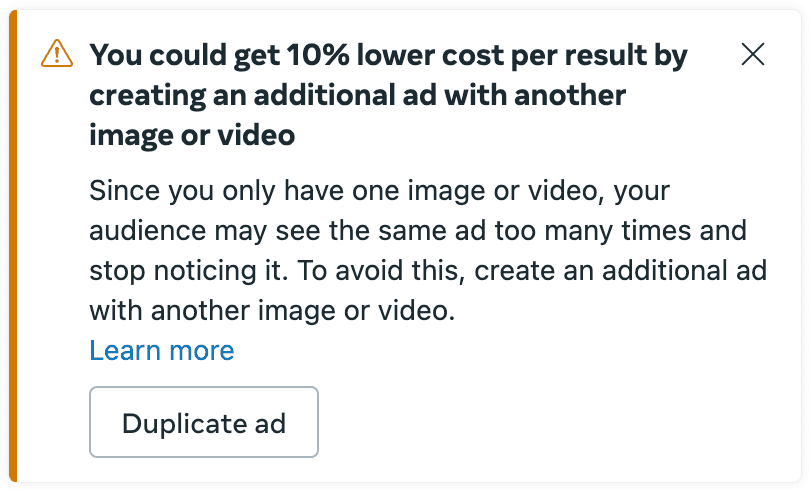
You may see the above warning after uploading your creative. This is one of their broad strokes that’s on par with the landlord painting the entire apartment white without bothering to tape off anything. You can definitely create multiple ads if you have the creative ready for it. But not necessary. If you are running evergreen ads, then this may be better practice in that case, but if promoting something specific, there’s only so much creative you can have.
Optimize text per person – another level of optimization you can choose to use, but isn’t necessary. It’s similar to the Text Improvement enhancement mentioned above.
Info labels – Another optional step if you have your creative or website set up for it.
Advantage+ Creative – This you already set up so you don’t need to change this unless you want to update something. If you want to swap images/videos, it’s better to do it under Media that shows the 3 placement formats.
This is where you will enter your target URL for your campaign. Could be your website, a pre-save link for your release, or Soundcloud, whichever you choose. This is were multiple ads can come into use, you can duplicate your ad and use a different link for each ad. Facebook Event and Website are likely the only ones you’ll use if you’re reading this.
You can add this if you are advertising internationally but will require that much more prep of your creative, so it is optional.
If you have your pixel set up, this is crucial for collecting data from your ads. Website events and offline events can both be checked. Pixel events is something I mentioned will be addressed in more detail in another post.
URL Parameters is something to also implement here if you are looking for more in-depth analytics. What is a URL Paramter? If you’ve ever seen a link that’s got something like this at the end of it-
?utm_source=meta&utm_medium=single&utm_campaign=Blog
– then you’ve come across URL Parameters. They’re set up to track specific campaigns and placements. They help you really zoom in on your web traffic. They are a more advanced area of ads, so you may not use them for the start, but if you start to get more involved in the business side of things where you are selling merch, managing tours, etc. then you may want to dive in and get started. Just to note, this will also require you setting up Analytics for your website. Most common is Google Analytics, and it has great integration for WordPress, Shopify, Mailchimp, etc. but I’ll also touch on that in other posts.
OKAY, we finally made it to the end. Now once you’re set up, you just hit Publish and your ads will get going. They will first run through Meta’s approval process, so you’ll see Processing in the status for a bit. Depending on your account, this could be a quick turnaround, or it could be an entire day before they begin running.
One important thing to note before hitting Publish is making sure the start time in your ad set has not passed, or you’ll get an error. When setting up the ad set, you can set it for hours ahead, or the next day, so that while you’re building out the rest, you don’t have to worry about getting this error. Then go back and adjust to your preferred start time. If you’re getting ads up for something like a new release coming out on a Friday, you can set that start time in the ad set, and if you’ve done it ahead enough to get it through the approval/processing, your ad should start delivering perfectly in time with your announcement.
And that, as long as it was, is the gist of setting up ads on Meta. As you can see, there are a lot of variables to consider that can have some drastic impact on how your ads perform.
Ads are just one part of a marketing ecosystem. If you think of it as a car, you want to keep all 4 tires inflated to keep your car on the road. In this case, the tires are areas of your online presence. If you have a very small social media presence, spending a lot of money on ads won’t exactly compensate, although the right campaign objectives can help bolster engagement on your socials. Platforms are secretly leaning towards paid content getting better exposure than organic content, but working at both types will only benefit you. Having a website or some regular web traffic on things like Soundcloud, Linktree, etc. will help give you the audience data to grow your audience. And keeping all of your links listed wherever you can post links helps build on that. It’s a bit cyclical, so you kind of just have to hop on as it’s moving and adjust along the way based on metrics.
Although this post is based on creating ads on Meta using Ad Manager, if you create them in Meta Business Suite or on Instagram, you’ll see similar setup options, so this post gives you a broader understanding of ad setup.
This is a more in-depth route to help filter out audience data so you’re not hitting the same people that have made conversions over and over, which is wasting ad money, but depending on how well you have your pixel events set up, you may not want to approach this method yet. This will also be explained in the blog post that goes more in depth about custom audience options.
At an artist level, you probably won’t have to utilize this much, but if you’re managing multiple pages/accounts, and there is some audience overlap, that’s where this can help. You can also have outside audiences shared to your account, so you gain outside audience data for your own ads.
As online attacks become more common, it’s best practice to take up any chance to set up security for your accounts. Most platforms have some form of 2-Factor Authentication (2FA) now. While this is a very useful and recommended tool, be sure you properly note any backup codes and add more than 1 device, in case you have your phone stolen or lost, because it makes recovering your authentication very difficult. You also need to be sure your general account security is decent, and you’re not using passwords like “password123” that compromises your online presence. I’ve personally had a Gmail account compromised and Google told me that my login details for 80+ websites was leaked and now out there on the dark web where scammers will try nefarious things like stealing your accounts or identity. Don’t be dumb, these people are always out there trying to take advantage of data breaches.
I hope this is helpful and can get people headed in the right direction. If you have any feedback or need clarification, I’m happy to address that. I’m posting this to help others gain an advantage on the industry, so I want to be sure this info I provide is as clear for readers as possible. If you want to keep up on future blog posts, you can subscribe at the bottom of this page, or follow at @moreonthefloor.records on Instagram. Or hit up the Discord server (invite here – https://discord.gg/hgZfGRYH), which is pretty dormant right now but I intend on getting much more active on there for 2025 as I try to steer away from relying on social media for the label’s endeavors.
One of the things I’m kicking off this year with More on the Floor is creating an audience pool. The plan is to get artists set up with the pixel data mentioned above, and have them grant the MOTF ad account a certain level of access to their page so that I can use their audience to build a custom audience. Kind of like how all the lions form Voltron, or how all the zords form the Megazord. And then, once these custom audiences are created, they are shared to the participating artists/pages, so that when they create ads, they are pushing their ads to a larger audience that consists of mostly first-party data. Artists/brands/labels that participate give access to their audience data in exchange for being shared these audiences. Think of it as a sort of cross-polinating, your ads reach relevant users that may not be in your audience. It’s what larger organizations do, but without the larger organization. If you’re interested in this, drop me a line (alex@moreonthefloor.com) and I can explain more on this, and also help you set up your profile on the business settings side if needed. To touch more on that point, I’ll also do another post on getting the settings in Meta set up so you can have full functionality of the marketing features, most I’ve already touched on in this post.
Join our email and sms list to get discount codes for merch and early access to the drops, exclusive tracks only for subscribers, and enter guest list giveaways for our events. You’ll never get spam from us, only the important stuff, and only once in a while. We also hate bloated inboxes.